
Brady Wilson
Off-Grid Electricity Explained in Plain English

Off-Grid Electricity Explained in Plain English
Living off-grid means your system makes, stores, and delivers electricity for your tiny house. That can sound complicated at first. It gets easier when you learn a few simple ideas.
The big idea is this: your house needs enough power right now and enough energy over time. Solar panels help make electricity. Batteries save energy for later. An inverter helps many home appliances use that energy.
What path does electricity take in an off-grid tiny house?
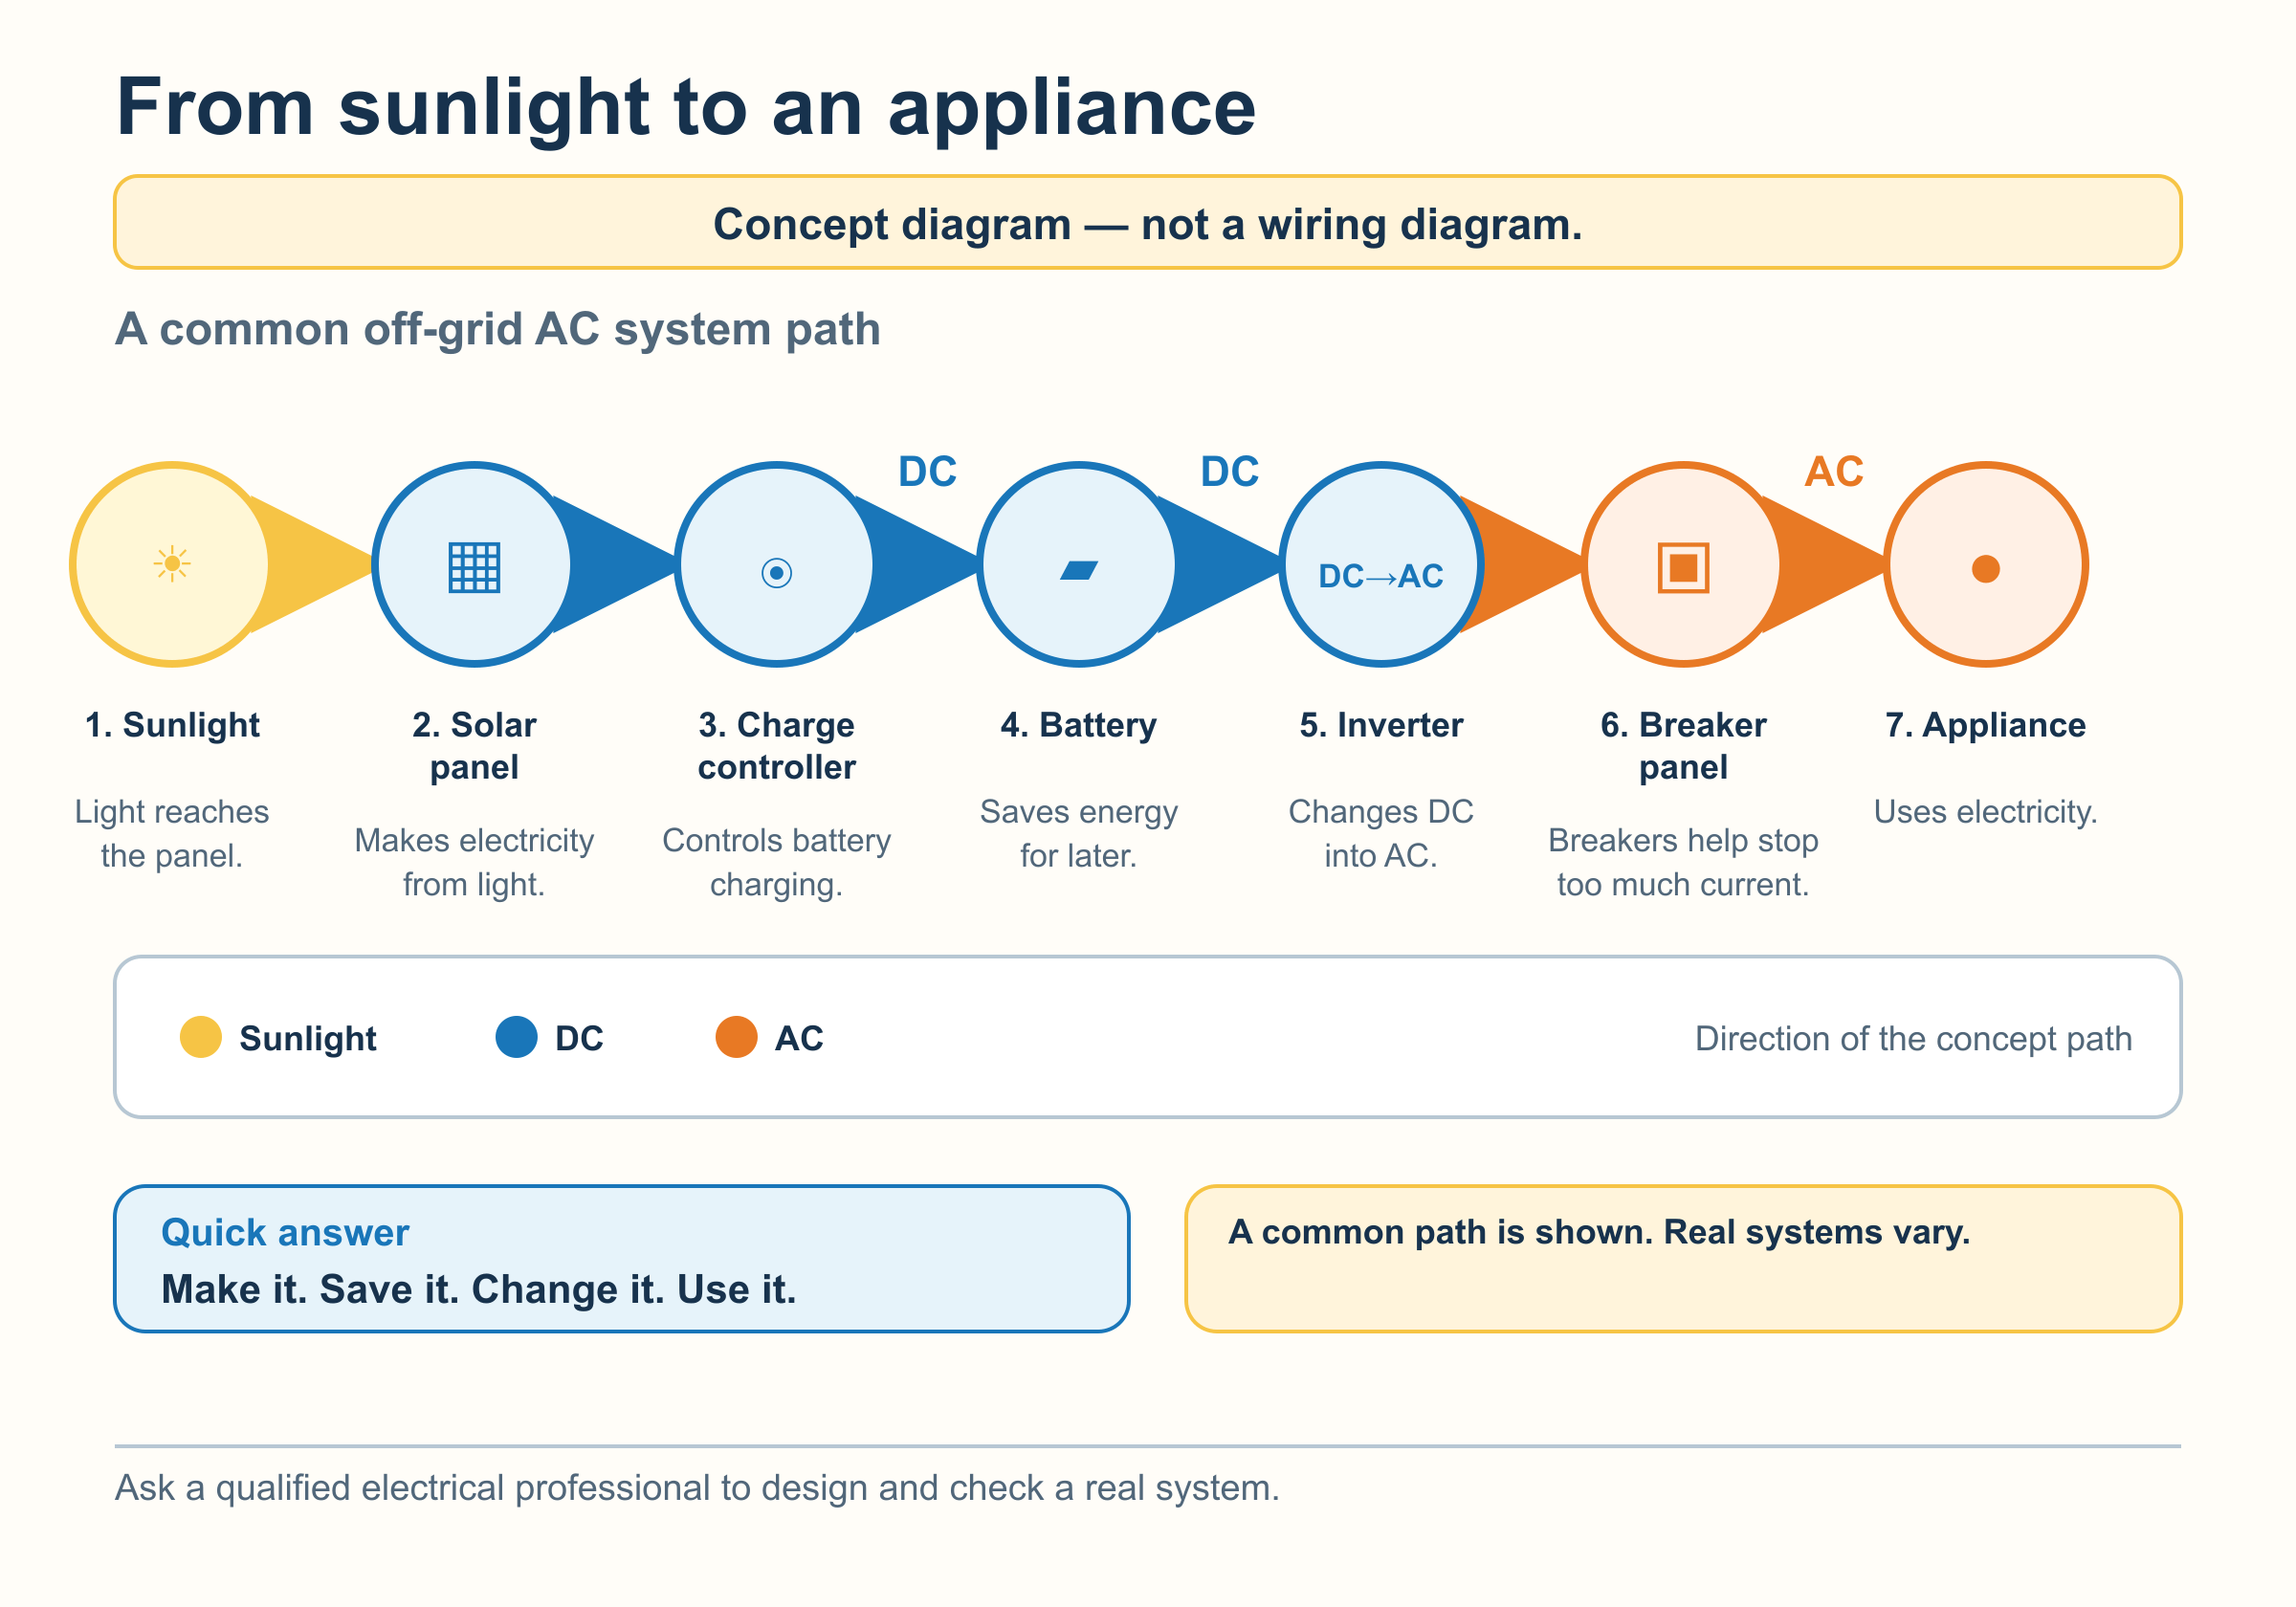
Here is a simple way to remember the job of the system:
- Make it: Solar panels make DC electricity from sunlight.
- Save it: A battery stores energy for later.
- Change it: An inverter changes DC power into AC power for many household appliances.
- Use it: A light, fan, refrigerator, or other appliance uses the power.
A charge controller helps the solar panels charge the battery in a controlled way. Breakers and fuses are safety devices that can stop too much current from flowing.
This is a concept picture, not a wiring diagram. Real systems can be arranged differently.
What do volts, amps, and watts mean?

These words help describe electricity.
- Volts describe electrical push.
- Amps describe electrical flow.
- Watts describe how much power is being made or used right now.
For a simple DC example, volts × amps = watts.
The water picture is a memory helper, not a perfect match. No tiny water pipes are hiding in your wires.
You do not need to do electrical math every time you use an appliance. But the words help you read labels and understand why some things need more power than others.
What is the difference between watts and watt-hours?

Watts tell you about power at one moment. Watt-hours tell you how much energy was used over time.
A 100-watt lamp uses 100 watts while it is on. If it stays on for 3 hours, it uses 300 watt-hours of energy.
100 watts × 3 hours = 300 watt-hours
This is why a small appliance can still matter if it runs for many hours. It is also why a high-power appliance can use less daily energy if it runs for only a few minutes.
What do the main parts of the system do?
| Part | Plain-English job |
|---|---|
| Solar panel | Makes DC electricity from sunlight. |
| Charge controller | Helps the panels charge the battery in a controlled way. |
| Battery | Stores energy for later. |
| Inverter | Changes DC power into AC power for many household appliances. |
| Breaker or fuse | A safety stop that can interrupt too much current. |
These parts work together. One part cannot do every job. For example, a solar panel makes electricity in sunlight, but a battery helps make energy available after the sun goes down.
How does appliance use add up over a day?

The easiest place to start is a simple list. Write down each appliance, its watts, how long it runs, and the watt-hours it uses.
Here is a classroom-style example for a hypothetical tiny house. These numbers are not a system recommendation. Real appliance use varies.
| Hypothetical use | Power | Time | Energy |
|---|---|---|---|
| Five LED lights | 40 W total | 5 hours | 200 Wh |
| Compact refrigerator | 45 W | 8 estimated running hours | 360 Wh |
| Fan | 60 W | 8 hours | 480 Wh |
| Microwave | 800 W | 15 minutes | 200 Wh |
| Laptop | 70 W | 3 hours | 210 Wh |
| Small water pump | 100 W | 12 minutes | 20 Wh |
| Example daily total | 1,470 Wh, or 1.47 kWh |
The refrigerator is plugged in all day, but its motor only runs part of the time. That is why this example uses 8 running hours.
The microwave needs a lot of power while it runs. But it runs for only 15 minutes in this example. The fan needs less power, but it runs much longer. Both add to the day’s energy total.
When you are ready to use your own appliance list for a planning estimate, try the Tiny House Solar Calculator.
Why does battery charge go up and down?

Battery state of charge means how full the battery is. During sunny hours, solar can add energy to the battery. At night, appliances use energy from it.
The graph is only an example. Weather, shade, solar output, appliance use, battery type, and system settings all change what happens in a real tiny house.
Do not use a picture like this to choose battery settings. Follow the battery and system documentation, and get qualified help for the actual system design.
For a more detailed stored-energy planning estimate, use the Tiny House Battery Bank Calculator.
What are continuous watts and surge watts?
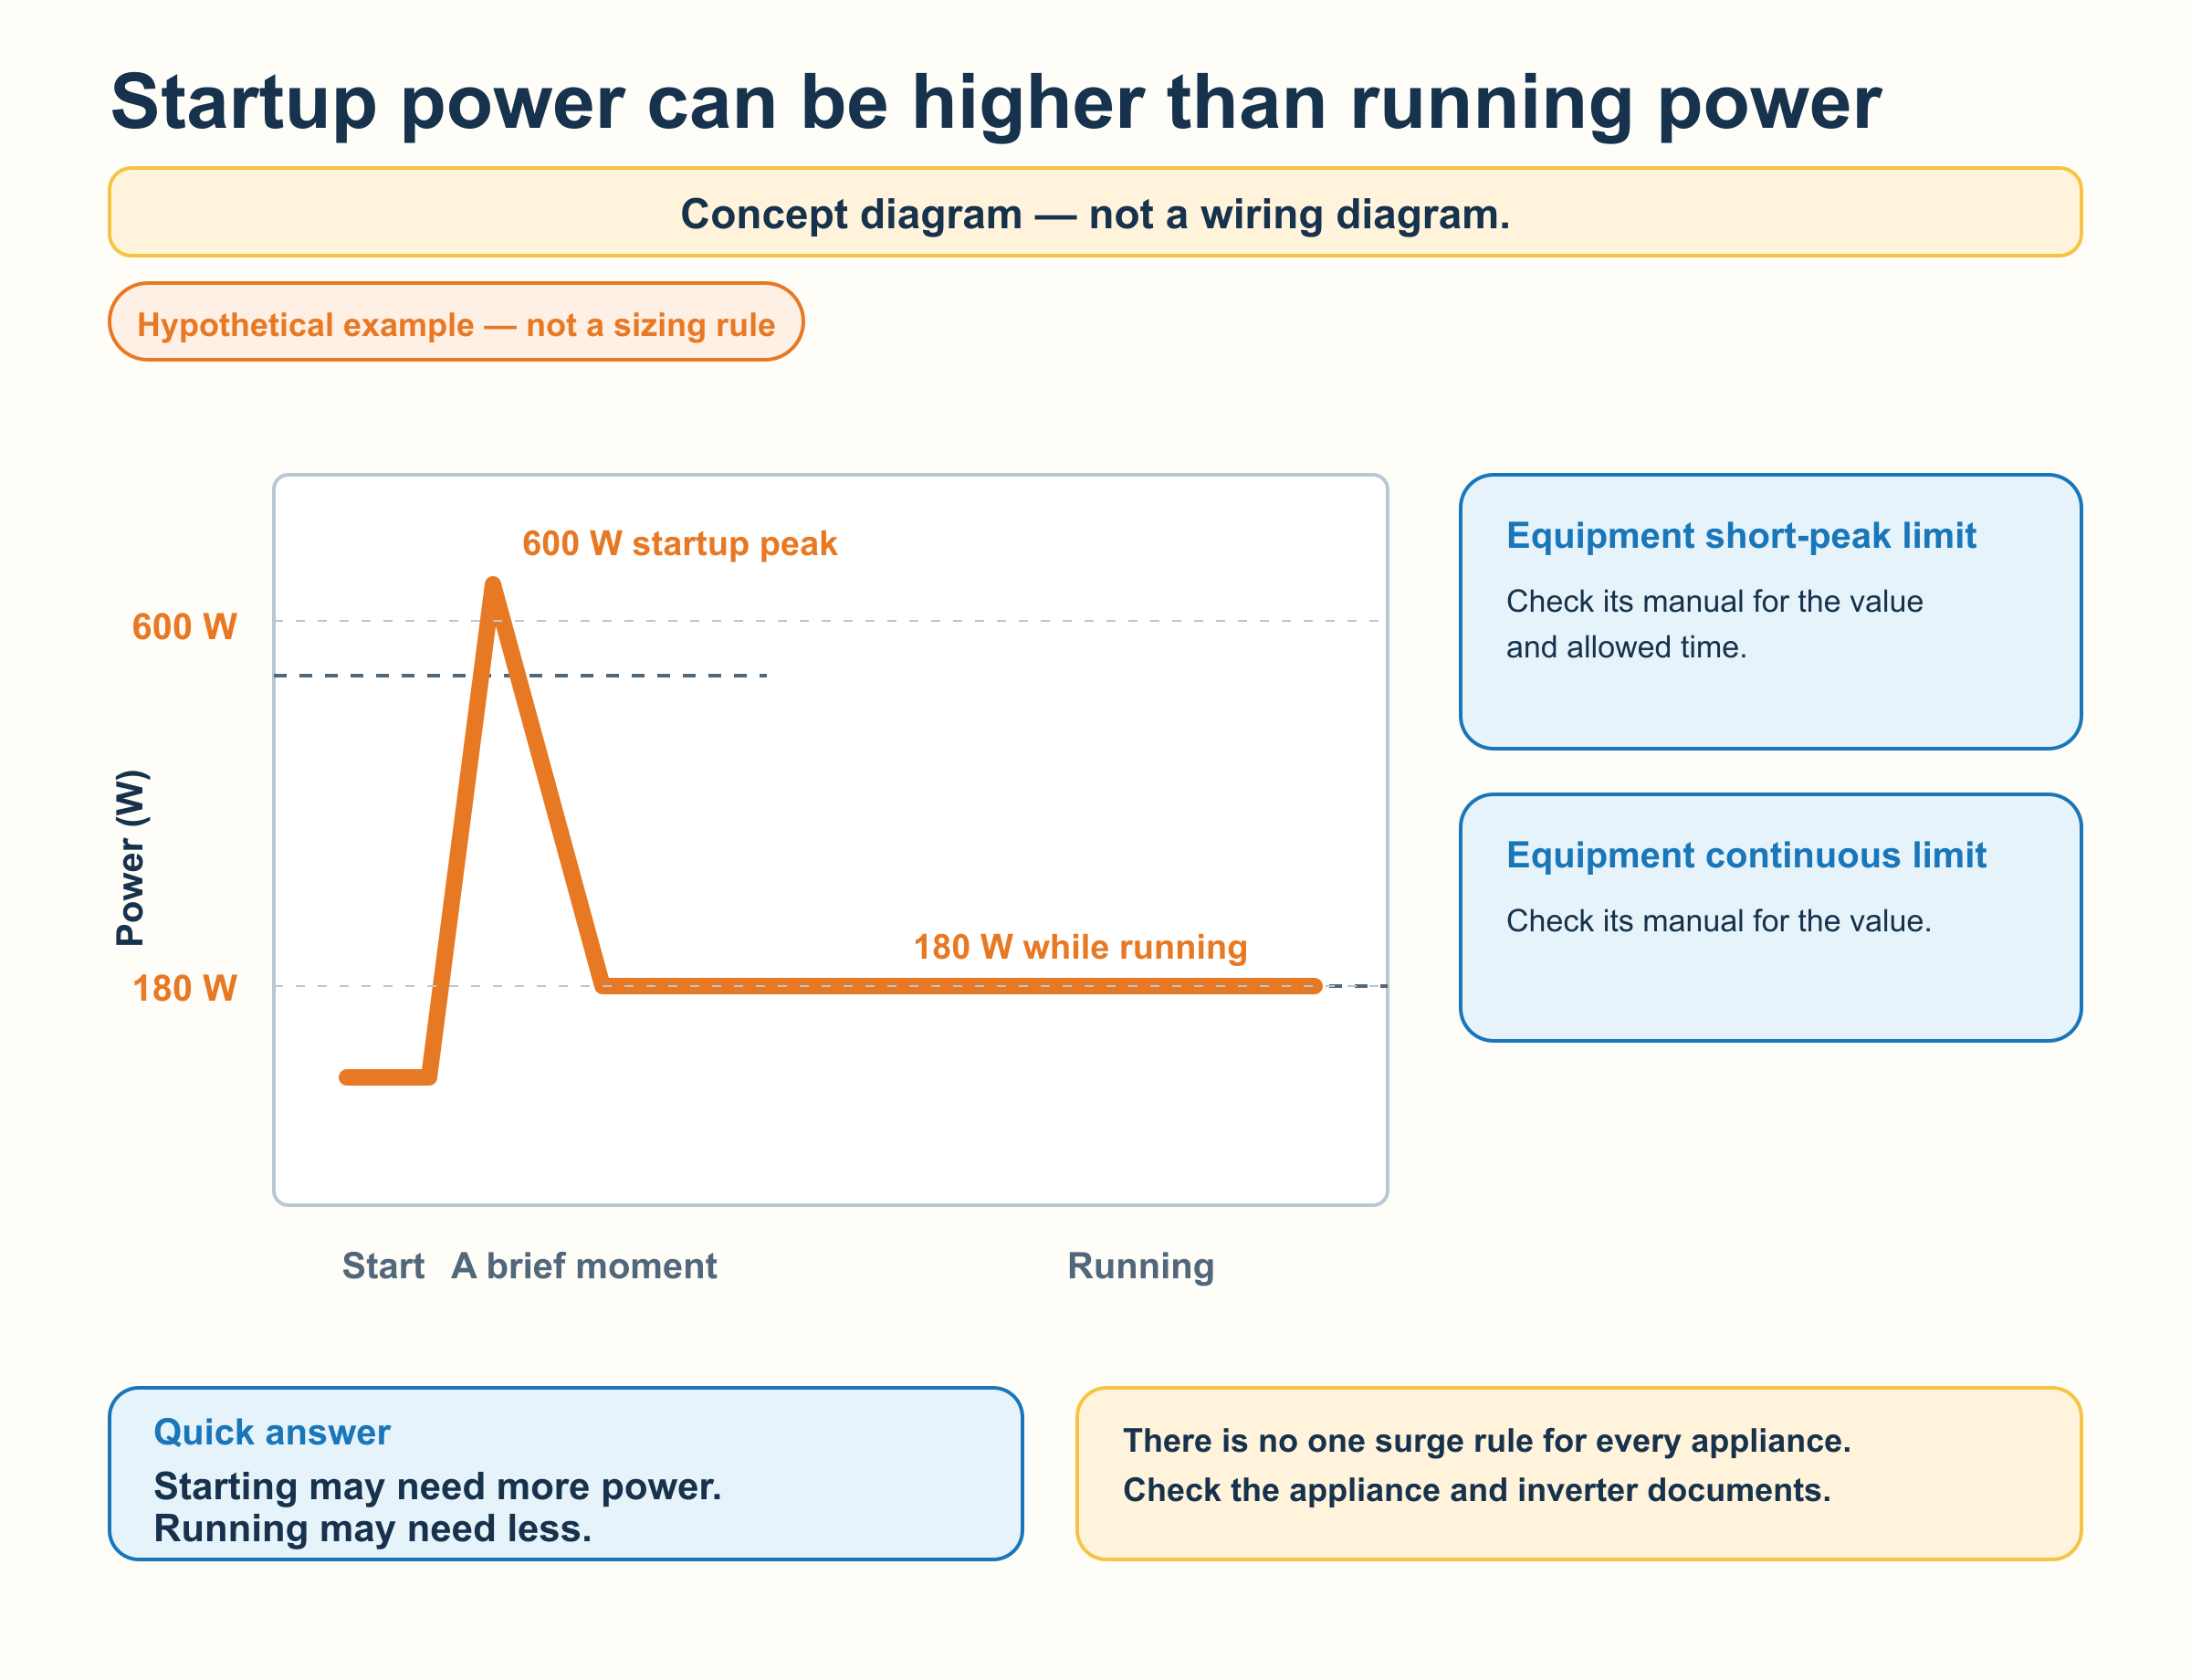
Some appliances need a short extra burst of power when they start. Some appliances, including some equipment with motors, may do this. After they start, they may use less power while they keep running.
- Continuous watts are the power needed while something keeps running.
- Startup or surge watts are the brief extra power some equipment may need to start.
In the visual example, a device briefly reaches 600 watts when starting and then runs at 180 watts. Those are made-up teaching numbers, not a sizing rule. Check the appliance and inverter documentation for real equipment.
Why do wires, grounding, breakers, and fuses matter?
They are part of the safety system.
Wires need to be suitable for the electricity they carry. Grounding and bonding help provide a safe path when something goes wrong. Breakers and fuses help protect circuits from too much current.
Do not guess at wire size, breaker or fuse size, grounding details, or battery settings. Those choices depend on the full system, equipment instructions, and local requirements. Ask qualified electrical help to design and check the real system.
Words you may see
AC (alternating current): A type of electricity used by many household appliances.
Amp: A measure of electrical flow.
Amp-hour (Ah): A battery label unit that helps describe capacity. It needs the battery voltage and other details to tell the whole energy story.
Appliance: A thing that uses electricity, such as a light, fan, refrigerator, or microwave.
Battery: Stores energy for later.
Breaker or fuse: A safety device that can interrupt too much current.
Charge controller: Helps solar panels charge a battery in a controlled way.
Continuous power: Power something needs while it keeps running.
DC (direct current): A type of electricity used by solar panels and batteries.
Inverter: Changes DC power into AC power for many household appliances.
Grounding and bonding: Parts of the safety system that help carry fault current safely when something goes wrong.
Kilowatt-hour (kWh): 1,000 watt-hours. Utility bills and battery labels often use this unit.
Off-grid: Not depending on the usual utility grid for electricity. An off-grid system makes and stores energy for the tiny house.
State of charge: How full a battery is.
Surge power: A short extra burst of power that some equipment needs when it starts.
Volt: A measure of electrical push.
Watt: A measure of how much power is being made or used right now.
Watt-hour (Wh): A measure of energy used over time.
A simple next step
First, make a list of what you want to run and how long you use it each day. Then use that list to have a clear conversation with a qualified person about a safe off-grid electrical system.
Some links on this page are affiliate links. See our affiliate disclosure.
What Size Solar Generator Do I Need? Free Sizing Tool for Tiny Houses


As an Amazon Associate I earn from qualifying purchases. This post may contain affiliate links, which means I may earn a commission if you buy through my links at no extra cost to you.
Most solar generator advice starts with the wrong question. People ask “which one is best?” when the question that actually matters is “which one can run my stuff, in my climate, without shutting off?”
A unit that looks enormous on paper can still fail you if your well pump draws a big surge on startup, or if you park somewhere that hits 15°F in January. And a unit that looks too small can be plenty if your loads are modest and you charge daily.
The tool below does that matching for you. Enter your real appliances — the ones on your actual list, not a preset — and it screens five portable solar generators against five constraints at once: daily energy, continuous power, starting surge, operating temperature, and each unit’s verified published limits. It tells you which units clear your requirements and, just as usefully, which ones don’t and why.
Solar generator sizing tool
Add your appliances with their watts and daily run hours, tell it what needs to run and start at the same time, and set your temperature range. Nothing is guessed on your behalf — there are no wattage presets or hidden load assumptions.
What size solar generator do I need? The short answer
For most tiny houses, the honest range looks like this:
- 300–500 Wh: Phones, laptops, lights, a fan. Weekend and backup use.
- 1,000–1,500 Wh: Adds a 12V fridge, water pump, and small kitchen appliances used briefly. This is where a lot of part-time tiny house living lands.
- 2,000–3,000 Wh: Full-time off-grid with a compressor fridge running around the clock, plus an induction burner or microwave used in short bursts.
- 3,500 Wh and up: Anything with a heating element running for real stretches — space heater, electric kettle on repeat, hair dryer — or a well pump with a hard starting surge.
Treat those as a sanity check, not an answer. Two tiny houses with identical square footage can land two categories apart based on one appliance. Run your own numbers through the tool above.
The four numbers that actually decide it
1. Daily watt-hours (how much you use)
Watts × hours per day, added up across everything. A 60W fridge that cycles about 8 hours of actual compressor time uses roughly 480 Wh a day. This number tells you what capacity you need.
Add a buffer. Cloudy days happen, batteries lose capacity in cold weather, and nobody’s estimate of their own usage is generous enough. The tool defaults to 1.2×, which is a reasonable floor.
2. Continuous watts (how much runs at once)
Capacity is the size of the tank. Continuous output is the size of the hose. A unit can hold 3,000 Wh and still trip if you ask it for more watts at one instant than its inverter can deliver.
Add up everything that could plausibly be on simultaneously — the worst realistic minute of your day, not the average one. Coffee maker plus fridge compressor plus water pump is a very ordinary Tuesday morning.
3. Starting watts (the number people forget)
Anything with a motor — fridge compressor, water pump, air conditioner, power tools — pulls a brief spike when it kicks on, often two to three times its running draw. A pump that runs at 300W might demand 900W for a half second.
This is the single most common reason a correctly-sized-on-paper solar generator disappoints people. The surge trips the inverter, the unit shuts off, and it looks like a defect when it’s really a sizing miss.
4. Temperature (the number almost nobody checks)
Lithium batteries have published operating and charging temperature ranges, and the charging range is usually narrower than the discharging range. Many units will not accept a charge below freezing at all without built-in heating.
If you’re in a cold climate, this constraint can eliminate an otherwise perfect unit. The tool checks your stated temperature range against each product’s published limits, which is why it sometimes rules out a model that looks fine on capacity alone.
Three sizing mistakes worth avoiding
- Sizing to capacity alone. Watt-hours is one of four constraints. It’s the one on the front of the box, which is why it gets all the attention.
- Forgetting recharge. A big battery you can’t refill is a big paperweight. If you’re charging by solar, your panel wattage and available sun hours determine whether you actually get back to full each day.
- Estimating appliance draw from memory. Check the label or the manual. Real numbers differ from remembered numbers by a lot, and always in the expensive direction.
Once you know your size
The selector screens units against your constraints — it’s a planning filter, not a purchase recommendation. When you’ve got a target range and a shortlist, these go deeper on the specific models:
- Best Solar Generators for Tiny Houses: Top 5 Picks for 2026 — hands-on comparison of the units in this tool
- Best Solar Kits for Tiny Houses — for recharging what you just sized
- How to Size a Tiny House Battery Bank — if you’d rather build a system than buy an all-in-one
- Tiny House Solar Calculator — panel and array sizing
A word on what this tool is not
This is a planning screen built on published manufacturer specifications. It is not electrical design, it is not a code compliance check, and it is not a guarantee that a given unit will work in your setup. Anything involving permanent wiring, a transfer switch, or your 240V circuits belongs with a licensed electrician.
Some links on this page are affiliate links. See our affiliate disclosure.
How to Size a Tiny House Battery Bank (2026 Guide)


The right battery-bank size for a tiny house starts with your actual daily energy use—not the square footage of the house or a generic “tiny-house battery” recommendation.
List the appliances you expect to run, calculate their daily watt-hours, account for inverter and conversion losses, decide how many backup days you need, and adjust for usable battery capacity, temperature, and aging. Then perform a separate power check to make sure the battery, battery-management system (BMS), inverter, wiring, and protective devices can support the loads you may run at the same time.
If you already have an appliance list, you can open the free Tiny House Battery Bank Calculator and work through it as you read this guide.
Important: This is a planning guide, not a final electrical design. Confirm every assumption against the manuals for the exact equipment you are considering. Installation requirements vary by location and by whether the home is treated as a permanent dwelling, movable tiny house, or RV. A qualified professional and your local authority having jurisdiction can tell you which requirements apply.
Battery sizing is both an energy problem and a power problem
Energy and power sound similar, but they answer different questions.
- Energy is how much electricity you use over time. It is usually expressed in watt-hours (Wh) or kilowatt-hours (kWh). Energy determines the approximate capacity of the battery bank.
- Power is how fast electricity must be delivered at a particular moment. It is expressed in watts (W) or kilowatts (kW). Power helps determine whether the inverter, BMS, battery bank, wiring, and protective devices can start and run your loads safely.
A battery bank can store enough energy for a full day and still be unable to start a pump or compressor, so a daily kWh estimate by itself is not a complete design.
Step 1: List your actual AC and DC loads
Start with an appliance audit. Record the following for each item:
- Running watts
- Hours used per day
- Quantity
- Whether it runs on AC or DC
- Starting or surge watts, if applicable
- Which other loads may run at the same time
Use the exact appliance label or manual when possible. A plug-in energy meter is useful for devices that cycle on and off. For equipment with several modes, measure or estimate the mode you will use.
Do not forget small loads that stay on for long periods. A modest router, fan, control board, or inverter standby draw can consume more daily energy than its wattage initially suggests.
Step 2: Calculate daily watt-hours
For a basic load, daily energy is:
watts × hours per day × quantity = watt-hours per day
Here is a simple illustrative load list:
| Load | Calculation | Daily energy |
|---|---|---|
| Mini refrigerator | 90 W × 8 h | 720 Wh |
| Laptop | 60 W × 4 h | 240 Wh |
| Lights | 20 W × 5 h | 100 Wh |
| Water pump | 60 W × 0.5 h | 30 Wh |
| Example total | 1,090 Wh/day |
This is only an example of the arithmetic. It is not a suggested tiny-house load profile. Your refrigerator duty cycle, climate, cooking method, water system, heating and cooling, and daily habits can change the result substantially.
For cycling appliances, use the estimated time the compressor or motor actually runs—not automatically 24 hours. If the refrigerator averages eight hours of compressor operation in a day, for example, use eight hours. Measuring the appliance over a representative day is better than guessing when that is practical.
Step 3: Account for AC losses and standby consumption
Battery power is DC. An inverter converts it to AC, and that conversion is not lossless. If your AC loads use 1,000 Wh and the inverter is 92% efficient, the battery must supply approximately:
1,000 Wh ÷ 0.92 = 1,087 Wh
The inverter may also consume power while it is on but not serving a load. Search mode can reduce that draw on supported equipment, but the behavior and consumption vary by model.
Keep AC and DC loads separate while estimating losses. AC loads pass through the inverter. DC loads may use direct battery power or pass through DC converters, which have their own losses. Applying one blanket efficiency value to every load can hide how the system actually works.
The calculator includes editable planning assumptions for inverter efficiency and idle consumption. Treat them as starting points, not universal specifications. Replace them with figures from the manual or datasheet for the exact inverter you plan to use.
Step 4: Choose your backup time
Autonomy is the length of time you want the battery bank to support the planned loads without meaningful charging.
If your corrected daily battery energy is 1.5 kWh and you want two days of autonomy:
1.5 kWh/day × 2 days = 3.0 kWh
More autonomy increases the required capacity. Choose it based on your charging sources, weather risk, backup strategy, critical loads, and tolerance for reducing consumption.
Think in scenarios instead of searching for a universal number: all normal loads on an average day, only critical loads during poor weather, or a hybrid plan using a generator during long periods without solar production.
Step 5: Adjust for usable capacity, temperature, and aging
The energy you want to use is not always the same as the nominal energy printed on a battery label.
Usable depth of discharge
Depth of discharge describes how much of the stored energy is removed. The appropriate planning limit depends on the exact battery model, chemistry, operating conditions, warranty terms, and desired service life.
If you need 3.0 kWh of usable energy and plan around 80% usable capacity, the nominal capacity calculation is:
3.0 kWh ÷ 0.80 = 3.75 kWh nominal
Do not treat 80% as a rule for every battery. Use the value supported by the manufacturer of the specific battery.
Temperature
Cold conditions can reduce available capacity, and some lithium batteries restrict charging at low temperature unless the system provides suitable protection or heating. The exact limits are model-specific. Base your temperature assumptions on the coldest conditions the battery location will actually experience—not only the typical outdoor temperature.
Aging reserve
Batteries do not retain their original performance forever. An optional aging reserve can keep a plan from being sized only for the day the battery is new. Warranty language, end-of-life capacity definitions, cycle conditions, temperature, discharge rate, and maintenance all matter, so use exact manufacturer documentation rather than a generic life claim.
Step 6: Understand kWh, Ah, and system voltage
Kilowatt-hours describe stored energy. Amp-hours describe charge at a stated voltage. You cannot interpret an Ah rating without also knowing the voltage.
The basic relationship is:
watt-hours = amp-hours × nominal volts
and therefore:
amp-hours = watt-hours ÷ nominal volts
The same nominal 5.12 kWh of energy is approximately:
| Nominal battery voltage | Approximate capacity |
|---|---|
| 12.8 V | 400 Ah |
| 25.6 V | 200 Ah |
| 51.2 V | 100 Ah |
These examples contain roughly the same energy. The Ah number falls as voltage rises, but that does not mean the higher-voltage bank stores less.
For the same power, a higher nominal system voltage generally requires less current because power = volts × amps. Lower current can make certain high-power designs more practical, but 48 V is not automatically better for every tiny house. Battery modules, inverter, chargers, solar charge controller, DC loads, disconnects, fuses, wiring, and other components must be compatible with the chosen architecture.
Choose voltage as part of the whole system design—not as a way to chase a smaller Ah number.
Step 7: Check running loads, starting loads, and current
After estimating energy capacity, make a second list of the loads that may operate simultaneously. Add their running power, then identify motors and compressors that may require extra starting power.
Compare those demands with model-specific limits for:
- Inverter continuous output
- Inverter surge output and allowed surge duration
- Battery continuous and peak discharge current
- BMS continuous and peak current
- Allowed series and parallel battery configurations
- Required overcurrent protection, disconnects, conductors, and connection methods
A surge rating without a duration is incomplete. A high advertised inverter surge does not help if the battery or BMS reaches its current limit first. Likewise, adding battery modules in parallel does not automatically make every connection layout acceptable.
The calculator provides planning screens for current, inverter, BMS, architecture, charge, surge, and conductor voltage drop. These are warnings and consistency checks—not equipment approvals. Its voltage-drop result covers the entered conductor run only; it does not size wire, fuses, breakers, terminals, or disconnects and does not establish code compliance.
How to use the Tiny House Battery Bank Calculator
Work through the calculator in this order:
- Select the installation type and battery chemistry you are considering.
- Choose the nominal system voltage.
- Enter AC and DC appliances with realistic watts, daily run time, and quantity.
- Add running, simultaneous, and startup information where known.
- Replace inverter-efficiency and idle assumptions with model-specific figures.
- Choose autonomy days and enter supported assumptions for usable capacity, temperature, and aging.
- Review the required nominal kWh and approximate Ah result.
- Continue through the power, current, architecture, charging, and voltage-drop checks.
- Read every warning and note the inputs that still need verification.
Use the Tiny House Battery Bank Calculator to create your planning estimate.
How to interpret the results
The result is best treated as three connected reports.
Capacity result
This estimates the nominal stored energy required by the appliance energy, system losses, standby consumption, autonomy, usable-capacity limit, temperature factor, and optional aging reserve you entered.
If the number seems surprisingly large, review high-wattage loads first. Electric space heating, resistance water heating, air conditioning, cooking appliances, and around-the-clock inverter operation can dominate a small energy budget.
Power-delivery warnings
These ask whether the proposed system can deliver enough power and current, including startup events. A capacity result does not clear those warnings. Missing startup or simultaneous-load information means more verification is needed.
Charging and solar comparison
An average-day solar estimate is not proof that the battery can be fully recharged under all conditions. Weather, shading, orientation, seasonal sun, array temperature, controller limits, battery charge limits, generator or shore charging, and energy used while charging all affect recovery.
For panel sizing and peak-sun-hour planning, use the Tiny House Solar Calculator guide. Keep battery autonomy and solar production as related but separate planning questions.
Why this result may be larger than a solar-only estimate
Two calculators can start with the same appliance list and produce different-looking battery numbers without either arithmetic result being wrong. One may show only the daily appliance energy. Another may include inverter losses, inverter idle draw, multiple backup days, usable-capacity limits, cold conditions, and aging reserve.
Compare the assumptions before comparing the final number. Ask:
- Are AC conversion losses included?
- Is inverter standby consumption included?
- How many autonomy days are used?
- Is the result usable energy or nominal battery capacity?
- Are temperature and aging adjustments included?
- Is the stated Ah value based on the same nominal voltage?
The TinyHouseGrid battery calculator is intentionally broader than a simple daily-watt-hour total. That can make its result larger, but it also makes the assumptions visible and editable.
What a shared planning link does—and does not—save
The calculator can create a planning link, but the link is not a complete electrical record.
It preserves daily AC and DC appliance energy and selected system settings. It does not preserve appliance names, appliance-level peak profiles, simultaneous-load selections, startup or surge information, or inverter idle watts and hours.
When a shared link is reopened, the calculator applies its default inverter-idle values. Review and replace those restored defaults. Re-enter the actual appliance profiles before relying on inverter, BMS, wiring, or peak-load screening.
If you are discussing the design with an installer or equipment supplier, send the original appliance and specification notes along with the planning link.
Choose equipment only after you understand the result
Once you have a defensible capacity range and a list of unresolved power checks, you can compare system approaches more intelligently.
- If you want a component-based solar system, start with the Top 5 Solar Kits for Tiny Houses.
- If you prefer a more portable or integrated power station, see the Best Solar Generators for Off-Grid Tiny-House Living.
- If fuel-powered backup is part of the plan, compare the Best Generators for Your Tiny House.
Those guides can help narrow the product category, but the exact equipment still has to match the voltage, energy, current, charging, environmental, installation, and safety requirements of your design.
Frequently asked questions
What size battery bank does a tiny house need?
There is no single size that fits every tiny house. Calculate your daily AC and DC energy, losses, standby use, autonomy, usable capacity, temperature adjustment, and aging reserve. Then verify running power, startup power, and battery/BMS current separately.
Is kWh or Ah better for comparing batteries?
kWh is usually clearer for comparing stored energy across different voltages. Ah is meaningful only when the nominal voltage is also stated.
Is a 48 V battery system always better than 12 V or 24 V?
No. Higher voltage generally reduces current for the same power, which can help with high-power systems, but every component must support the selected architecture. Load size, DC equipment, expandability, availability, cost, and qualified design support all matter.
Can this calculator size my wires and fuses?
No. It can estimate conductor voltage drop from the inputs you provide, but that is not wire, fuse, breaker, terminal, disconnect, or code sizing. Final protection and conductor choices require the exact equipment instructions and applicable local requirements.
Does a copied calculator link preserve the inverter and BMS checks?
Not completely. The link preserves daily AC/DC energy and selected settings, but it omits the appliance-level peak, simultaneous-load, surge, and inverter-idle details needed for dependable screening. Re-enter the actual profiles and review the restored inverter-idle defaults.
Build the estimate, then verify the system
A useful battery plan does not begin with a battery advertisement. It begins with the loads you need to support and the conditions in which the system must operate.
Calculate energy first, check power second, and document every assumption that still depends on a product manual or local requirement. Then use the result to compare equipment that actually fits the job.
Open the Free Tiny House Battery Bank Calculator
Technical references
Off-Grid Water Pumps for Tiny Houses, Cabins & Cottages (2026)


As an Amazon Associate I earn from qualifying purchases. This post may contain affiliate links, which means I may earn a commission if you buy through my links at no extra cost to you.
A good tiny house water pump is one of those things you barely notice when it is right and think about constantly when it is wrong. Too small and your shower sputters. Too loud and it rattles the whole wall. Too power-hungry and it becomes another load your solar setup has to carry.
For most tiny houses using a freshwater tank, the best choice is a 12-volt on-demand diaphragm pump in the 3.0 to 5.5 GPM range. It is compact, affordable, self-priming, easy to wire into an off-grid system, and proven in RVs, vans, cabins, and tiny homes. If you are pulling from a deep well, boosting city water pressure, or building a hand-pump backup, the right answer changes.
Important: “Off-grid” can mean two different water setups. Many tiny houses use a freshwater tank with a small 12V demand pump. A permanent tiny house on rural land may instead pull from a drilled well, which requires a properly sized well pump. Those are different systems, so do not use a 12V RV-style pump as a deep-well pump. The same logic applies whether you live in a tiny home, a small house, or a mobile home: your water source decides the pump, not the size or label of the building.
Quick Answer
For a typical tiny house with a freshwater tank, buy a 12V demand pump such as the Shurflo 4008 Revolution, SEAFLO 33-Series, or Flojet Triplex 03526. For quieter operation, start with the mounting and hose connections. Diagnose rapid cycling before adding parts, and follow the exact pump manual before considering an accumulator; the SHURflo 4008 bypass pump does not require one. If you are pumping from a well, look at a submersible well pump instead. If you are fully off-grid, check the pump’s watt draw against your battery and solar setup with the Tiny House Solar Calculator before you buy.
Best Tiny House Water Pump Options
| Pump Type | Best For | Typical Cost | Power | Best Pick |
|---|---|---|---|---|
| 12V demand diaphragm pump | Most tiny houses with freshwater tanks | $60 to $180 | 12V DC | Shurflo 4008 Revolution |
| Premium 12V variable-speed pump | Quieter showers and steadier pressure | $180 to $350 | 12V DC | Remco Aquajet |
| 120V booster pump | Tiny homes on grid power or full hookups | $150 to $500 | 120V AC | Aquastrong 115V shallow well booster pump |
| Submersible well pump for drilled wells | Deep wells and permanent rural sites | $500 to $2,000+ | 120V/240V AC or solar DC | Hallmark Industries deep well pump |
| Manual hand or foot pump | Backup water, cabins, simple sinks | $30 to $1,500+ | None | Whale Babyfoot freshwater foot pump |
1. 12V Demand Diaphragm Pumps
Best for: Most off-grid tiny houses, tiny houses on wheels, cabins with freshwater tanks, and simple DIY plumbing systems.
A 12V demand pump is the standard tiny house water pump for a reason. It sits between your freshwater tank and your plumbing lines. When you open a faucet, the pressure drops, the pump turns on automatically, and water flows. When you close the faucet, the pump shuts itself off.
That simple on-demand behavior is exactly what most tiny houses need. You do not need a giant pressure tank, complicated controls, or household-scale plumbing gear. You need reliable pressure for a sink, shower, and maybe a small washer or water heater.
Top Picks
- Shurflo 4008 Revolution – A proven 12V pump with 3.0 GPM flow and 55 PSI shutoff pressure. Best all-around pick for most tiny houses.
- SEAFLO 33-Series – Good budget option, commonly sold in 3.0 GPM and 45 PSI configurations.
- Flojet Triplex 03526 – Compact, self-priming, and popular in RV-style water systems.
- Remco Aquajet – A smoother, quieter upgrade if you care more about comfort than lowest cost.
Prices and availability can change. Check the current listing, model, and seller before buying.
Pros: Affordable, compact, easy to install, works directly from a 12V battery bank, self-primes from a freshwater tank, and only runs when water is being used.
Cons: Can be noisy if mounted directly to a wall or floor, may pulse at low flow, and needs a strainer before the pump to catch tank debris.
Tiny house buying tip: For one bathroom and one kitchen sink, 3.0 GPM is enough for most people. If you want a stronger shower or plan to run multiple fixtures at once, step up toward 4.0 to 5.5 GPM. Do not oversize just because the bigger number looks better. A larger pump can use more power, make more noise, and cycle harder in a small plumbing system.
2. 120V Booster Pumps
Best for: Tiny houses parked permanently with grid power, city water, cistern systems, or a larger pressure-tank setup.
A 120V booster pump is closer to what you might see in a small residential water system. It can be useful if your tiny house is connected to a low-pressure water source or if you are building a more permanent setup with a cistern and household fixtures.
For a tiny house on wheels, a 120V booster pump is usually more pump than you need. For a foundation-built tiny home or backyard guest house, it can make sense, especially if you already have regular household AC power available.
Top Picks
- Aquastrong 115V shallow well booster pump – A budget-friendly 115V booster/jet pump with a small pressure tank for cabins, cisterns, shallow wells, and permanent tiny homes.
Pros: Better pressure for residential-style plumbing, works well with larger systems, and can feel more like a normal house.
Cons: Requires AC power, may need more plumbing space, costs more than a simple RV-style pump, and is not the easiest choice for mobile tiny houses.
3. Submersible Well Pumps
Best for: Tiny houses on rural land with a drilled well.
If your water source is a real well, the pump decision starts with well depth, flow rate, static water level, and power source. A small 12V RV pump is not designed to pull water from a deep well. You will usually need a submersible well pump sized for the depth and output of that specific well.
This is the category where professional advice is worth paying for. A pump that is too small may not lift water reliably. A pump that is too large can short-cycle, waste power, and stress your well system. Treat these as example brands and product categories, not one-size-fits-all picks.
Top Picks
- Grundfos SQFlex – A premium solar-compatible well pump line for off-grid properties, best sized with help from a well professional.
- Goulds submersible well pump – A respected well-pump brand for permanent installations where the exact model should match the well depth, voltage, and flow needs.
- Hallmark Industries deep well pump – A lower-cost Amazon-friendly option often used in budget rural setups, but still needs to be matched to the actual well.
Pros: Correct solution for deep wells, can supply a full tiny house from a permanent water source, and can be paired with a cistern or pressure tank.
Cons: Expensive, installation is more involved, power draw can be significant, and sizing depends on your actual well data.
Solar Note
Water pumps do not usually run all day, but some can pull a heavy surge when they start. If your tiny house is solar-powered, include the pump in your appliance list before buying batteries, panels, or an inverter. The free Tiny House Solar Calculator is a good place to estimate the load.
For the battery side, check pump startup power against the battery, inverter, and BMS before finalizing equipment.
4. Manual Hand and Foot Pumps
Best for: Backup water, simple sinks, rustic cabins, and ultra-low-power tiny houses.
A manual pump is not the most convenient everyday option, but it has one huge advantage: it works without electricity. That makes it useful as a backup for off-grid living, especially if your water system depends on batteries, solar, or a generator.
There are two very different versions here. A small foot pump can move water from a jug or tank to a sink. A serious hand pump can pull from a well, but those systems cost much more and need proper installation.
Top Picks
- Whale Babyfoot freshwater foot pump – Great for simple sink setups, outdoor kitchens, and backup water systems.
- Valterra RP800 Rocket hand pump – Basic hand-pump option for jugs and small tanks.
- Simple Pump – Premium manual well pump for serious off-grid backup, best researched directly because installation is highly site-specific.
- Bison Pump – Heavy-duty manual well pump for permanent rural installations, best researched directly because installation is highly site-specific.
Pros: No power required, very reliable, useful during outages, and simple to maintain.
Cons: Slower flow, manual effort, not ideal for normal showers, and high-quality well hand pumps can be expensive.
How to Choose the Right Tiny House Water Pump
Start With Your Water Source
- Freshwater tank inside or under the tiny house: Choose a 12V demand diaphragm pump.
- City or park water hookup (common for mobile homes and small houses in town): You may not need a pump at all unless the pressure is low.
- Cistern or rainwater tank: Use a 12V demand pump for small systems or a booster pump for permanent household-style setups.
- Drilled well: Use a submersible well pump sized to your well.
- Emergency backup: Add a foot pump or hand pump.
For Cabins and Seasonal Cottages
A cabin or cottage does not need a different pump just because of the building label. Start with the water source and how you use the place. If water comes from a stored freshwater tank and you need a sink or shower, the 12V demand pumps above are a good starting point. With a drilled well, use a well pump sized to that well; a small tank pump cannot take its place. If you have a pressurized hookup, check the pressure before buying a booster—you may not need a pump at all.
For a seasonal place that sits unheated through freezing weather, plan how to drain or winterize the pump and plumbing according to the equipment instructions. A simple sink-only cabin can use a manual foot pump as a no-power option, but that is not a substitute for a shower system.
For Mobile Homes and Small Houses
A mobile home or small house follows the same rule as a cabin: start with where the water comes from.
- Park or city water: Many mobile homes in parks and small houses in town are already on pressurized water, so you may not need a pump at all. If pressure feels weak, check it with a simple pressure gauge first. Low pressure is sometimes a clogged aerator, a dirty filter, or a partly closed valve. If the supply really is low, a 120V booster pump is the usual fix.
- Private well: Use a well pump sized to that well, usually with a pressure tank. A 12V RV-style pump cannot take its place.
- Storage tank or cistern: A 12V demand pump works for a small sink-and-shower setup. A 120V booster pump with a pressure tank fits a more household-style system with more fixtures.
Mobile homes often run supply lines under the floor, where they are exposed to freezing weather. Whatever pump you choose, protect it and its lines in cold weather and follow the equipment instructions for winterizing.
Match Flow Rate to Your Fixtures
Flow rate is measured in gallons per minute, or GPM. A tiny house does not need the same flow as a full-size home. Most tiny house fixtures are low-flow, and most people are not running two showers and a washing machine at once.
- 1.0 to 2.0 GPM: Good for a sink-only setup.
- 3.0 GPM: Best fit for most tiny houses with a sink and shower.
- 4.0 to 5.5 GPM: Better for stronger shower pressure or multiple fixtures.
- 6.0+ GPM: Usually unnecessary unless you are building a larger cabin-style system.
Check Pressure, Not Just GPM
Pressure is measured in PSI. Most RV-style pumps shut off around 45 to 55 PSI, which is enough for a tiny house shower, sink, and water heater. If your pump pressure is too low, showers feel weak. If it is too high, you can stress fittings and create leaks.
For most tiny house plumbing, aim for 40 to 55 PSI. Use a pressure regulator if you connect to city water, because campground or municipal water pressure can be higher than your tiny house plumbing should handle.
Think About Noise
In a normal house, the pump might be far away. In a tiny house, it may be two feet from your bed. Noise matters.
To keep a water pump quiet, mount it on rubber isolation feet, use flexible hose on both sides of the pump, and avoid fastening it to a thin wall panel. If it cycles rapidly, diagnose the cause before adding parts. An accumulator is model-dependent; the SHURflo 4008 bypass pump does not require one. A cheap pump mounted badly can sound terrible. A mid-range pump mounted well can be perfectly livable.
Add the Small Parts People Forget
The pump is not the whole system. Plan for the supporting parts before you start cutting pipe.
- SHURFLO 255-313 inline pump strainer before the pump to catch grit from the tank.
- SEAFLO 0.75L accumulator tank is an optional accessory only for a pump/system whose manufacturer instructions support it. Diagnose rapid cycling first; the SHURflo 4008 bypass pump does not require an accumulator.
- 1/2 inch PEX shutoff valves so you can service the pump without draining the whole system.
- RVGUARD adjustable water pressure regulator for city water connections.
- PENTAIR SHURFLO 94-591-01 pump silencing kit to reduce vibration.
What Size Pump Do You Need?
For most tiny homes with a freshwater tank, the sweet spot is simple: 3.0 GPM and 45 to 55 PSI. That is enough for a normal low-flow shower and sink without making the system harder to power or quiet down.
Choose a bigger pump only if you have a clear reason, such as a larger shower head, multiple fixtures used at the same time, or a washer that needs stronger flow. Choose a smaller pump if you are only feeding a kitchenette sink or want an ultra-simple water setup.
Installation Tips for Tiny Houses
- Keep the pump close to the tank. Shorter suction lines help the pump prime faster and work less.
- Install a shutoff valve on both sides. This makes pump service much less annoying.
- Use flexible hose near the pump. It reduces vibration transmitted through the plumbing, reducing transmitted noise and helping protect fittings.
- Put the strainer where you can reach it. You will need to clean it.
- Protect the pump from freezing. A cracked pump head is a common cold-weather failure.
- Wire it with the right fuse. Follow the pump manual for fuse size and wire gauge.
How to Protect a Tiny House Water Pump From Freezing
A frozen pump is one of the most common cold-weather failures in a tiny house or cabin. Water left inside the pump head expands as it freezes and can crack the housing, the check valve or the fittings. Plan for freezing weather before the first cold snap, not after.
If You Live There Through the Winter
- Keep the pump inside the heated space. A pump under the sink or in an interior cabinet is much safer than one in an unheated compartment or crawl space.
- Insulate exposed lines. Foam pipe insulation on any line that runs along an outside wall, under the floor or through a skirted trailer is cheap insurance.
- Add heat cable to runs you can’t keep warm. A self-regulating cable such as the MAXKOSKO 30 ft self-regulating heat tape puts out more heat as the pipe gets colder. For one short exposed section, a small kit like the Frost King HC6A 6 ft automatic heat cable can be enough. Follow the installation instructions exactly, including whether the cable may overlap or be covered with insulation, and plug it into a GFCI-protected outlet.
- Protect the water source too. A tank, hose or well line that freezes stops the pump just as surely as a frozen pump head.
Heat Cable and Off-Grid Power
Heat cable runs on electricity, and on cold nights it can run for hours. Check the watts per foot on the label and do the math before winter. Example: a 30-foot cable rated at 5 watts per foot can draw up to about 150 watts when it is cold. If it runs 12 hours overnight, that is up to about 1,800 watt-hours, which is more than many 1,000Wh power stations hold. Self-regulating cable draws less as the pipe warms, so real use is often lower. Plug your numbers into our tiny house battery bank calculator to see whether your battery can keep up. If not, insulation and pump placement come first.
If You Leave for the Winter (Seasonal Cabins and Cottages)
- Turn off power to the pump and shut off or disconnect the water supply.
- Open every faucet, including the shower, and open any low-point drains.
- Drain the freshwater tank and the water heater if you have one, following the heater maker’s instructions.
- Drain the pump. Many 12V demand pumps have inlet and outlet fittings you can loosen to let water out. Check your pump’s manual for its own winterizing steps.
- Consider non-toxic RV antifreeze for traps and lines you can’t fully drain. Use only RV or marine antifreeze whose label says it is safe for potable (drinking) water systems. SPLASH RV & Marine Antifreeze (-50°F) is one widely sold option; check the jug’s label before you use it. Never use automotive antifreeze in drinking water lines. In spring, flush the system thoroughly before you drink the water.
A cabin that is only used in summer can also skip the pressure system for winter visits entirely. A manual foot pump such as the Whale Babyfoot (see the manual pumps section above) and a jug of water keep the sink usable without any lines to freeze.
Common Water Pump Problems
Pump runs but no water comes out: Check the tank level, suction line, strainer, and whether the pump has lost prime.
Pump cycles on and off rapidly: Diagnose the cause before adding parts. Check for restrictive plumbing or low-flow faucets/showerheads and follow the exact pump manual’s troubleshooting guidance. For the SHURflo 4008, the manual also identifies a shutoff pressure set too low; pressure-switch or bypass adjustment belongs with a qualified technician. Do not assume a missing accumulator is the cause: the 4008 bypass pump does not require one.
Water pressure is weak: Check the battery voltage, clogged filter, kinked line, fixture aerator, and pump pressure rating.
Pump is loud: Add rubber isolation, flexible hose, and make sure the pump is not screwed directly to a thin wall or cabinet panel.
Pump turns on randomly: That usually means a small leak, a dripping faucet, a bad check valve, or pressure bleeding back toward the tank.
Best Pump by Tiny House Setup
- Most off-grid tiny houses: Shurflo 4008 Revolution with a strainer and flexible hose connections; its bypass design does not require an accumulator tank.
- Budget build: SEAFLO 33-Series and a simple inline strainer.
- Quiet comfort build: Remco Aquajet or another variable-speed pump with flexible hose connections.
- Permanent tiny home with hookups: Skip the pump if city pressure is good; add a booster only if pressure is low.
- Well water property: Use a properly sized submersible well pump and consider a cistern or pressure tank.
- Backup water plan: Add a Whale Babyfoot freshwater foot pump or manual hand pump.
The Bottom Line
If your tiny house has a freshwater tank, start with a 12V demand pump around 3.0 GPM and 45 to 55 PSI. Add a strainer, flexible hose, and shutoff valves. Diagnose rapid cycling before adding parts, and consider an accumulator only when the exact pump/system instructions support it; the SHURflo 4008 bypass pump does not require one. For most people, that setup is affordable, compact, easy to repair, and strong enough for everyday tiny-house living.
If you are pulling from a well, boosting city water, or trying to build a no-power backup system, choose the pump around that water source instead of forcing an RV-style pump to do a job it was never built for. And if you are off-grid, run the pump through the Tiny House Solar Calculator before you finalize your battery, inverter, and solar panel sizes.
Some links on this page are affiliate links. See our affiliate disclosure.
Types of Toilets for Tiny Houses and Which is Best with Prices


As an Amazon Associate I earn from qualifying purchases. This post may contain affiliate links, which means I may earn a commission if you buy through my links at no extra cost to you.
When you’re designing a tiny house, no decision gets debated more than the toilet. It affects your plumbing, your power budget, your maintenance routine, and, let’s be blunt, your daily quality of life. After comparing every major option on the market, here’s the full breakdown: four toilet types, practical buying considerations, and which one actually makes sense for how you plan to live.
Quick Answer
For most full-time, off-grid tiny house dwellers, a composting toilet, such as Nature’s Head or OGO, is the best balance of cost, simplicity, and independence. If you’re parked with full hookups, a standard or RV flush toilet is cheaper and easier. Big budget and no patience for compost? An incinerating toilet is the luxury option. Weekend use only? A cassette or portable toilet can be a practical option.

Quick Tips Before You Buy
- Measure first. Most composting toilets need 19 to 22 inches of depth plus crank clearance. Measure your bathroom before falling in love with a model.
- Count total cost, not sticker price. A septic connection can cost $3,000 or more to install, so include infrastructure costs in your comparison.
- Know your power budget. Incinerating toilets draw 1,500 to 2,000 watts per cycle. That is a serious load if you’re on solar. Run your numbers in our tiny house solar calculator before committing.
- Check local codes. Some counties require a permitted septic or sewer connection regardless of what toilet you use.
1. Composting Toilets
How they work: Composting toilets separate liquids from solids. Solids go into a chamber with peat moss or coconut coir and break down naturally; liquids go into a bottle you empty every few days. No water, no plumbing, no septic.
Best for: Full-time off-grid living. This is the default choice in the tiny house community for good reason.
Pros: No water or sewer hookup, minimal power from a small vent fan, legal almost everywhere, and a 2 to 4 week empty cycle for two people.
Cons: Up-front cost, you handle the emptying, it needs a vent run to the outside, and there is a learning curve the first month.
Top Picks and Buying Notes
- Nature’s Head – The gold standard; over a thousand reviews averaging 4.4 stars. Manual crank agitator, nearly indestructible.
- OGO Origin – Push-button electric agitator instead of a crank; smaller footprint than Nature’s Head.
- Cuddy Lite.
- Separett Tiny – Urine-diverting design, best when space is extremely tight; needs power for its fan.
Before you buy, check the current buying options for the exact model and seller, and confirm what is included.
2. Incinerating Toilets
How they work: Electric or propane heat burns waste down to a cup of sterile ash. No water, no compost handling. You just empty an ash pan every few weeks.
Best for: Cold climates, people who hate maintenance, and tiny house owners who have the budget and power to spare.
Pros: Cleanest user experience of any off-grid option, no smell when vented correctly, and works in freezing temperatures.
Cons: Expensive to buy and run. Each cycle costs roughly $0.80 to $1.00 in electricity or $1 to $2 in propane. The electric draw, usually 1,500 to 2,000 watts, can dominate a small solar setup. Check your system size first.
Top Picks and Buying Notes
- Cinderella Comfort, electric.
- Cinderella Freedom, propane – the off-grid favorite since it sidesteps the electric load.
- Incinolet TR, electric – the longtime US-made option.
3. Traditional and RV Flush Toilets
How they work: Exactly like the one in a regular house, which is the whole appeal. A flush toilet requires a water supply and a sewer, septic, or black tank connection.
Best for: Tiny houses parked permanently with full utility hookups, or backyard ADUs tied into the main house.
Pros: Cheapest hardware, zero learning curve, and guests never ask questions.
Cons: Useless off-grid. The hookup is the real cost. A septic install can run $3,000 to $10,000 or more. RV-style versions also need black tank dumping.
Top Picks and Buying Notes
- Standard low-flow residential toilet.
- RV gravity-flush toilet, Dometic or Thetford – pairs with a black tank.
- Macerating upflush toilet, Saniflo-style – lets you put a bathroom where gravity drainage cannot reach.
4. Portable and Cassette Toilets
How they work: A self-contained unit with a small freshwater flush tank on top and a sealed waste cassette below that you carry to a dump point or toilet to empty.
Best for: Weekend-use tiny houses, builds in progress, or as a backup.
Pros: Cheapest entry point, zero installation, and you can take it with you.
Cons: Small capacity, usually 2 to 4 days of use, chemical smell management, and nobody loves the emptying trip.
Top Picks and Buying Notes
- Thetford Porta Potti 565E – electric flush, the comfortable one.
- Camco Standard 5.3 gallon – bare-bones option.
- Laveo Dry Flush – bags waste with no water or chemicals; cartridges are the ongoing cost.
Before you buy, check the current buying options for the exact model and seller, and confirm what is included.
Price Comparison Table
| Type | Example Model | Ongoing Cost | Off-Grid? |
|---|---|---|---|
| Composting | Nature’s Head | About $5/month for coir | ✅ Yes |
| Composting | Cuddy Lite | About $5/month for coir | ✅ Yes |
| Incinerating | Cinderella Freedom | $1 to $2 per propane cycle | ✅ Yes |
| Incinerating | Incinolet TR | About $0.80 to $1 per electric cycle | ⚠ Needs large power system |
| Flush | Standard low-flow | Water and sewer fees | ❌ No |
| Cassette | Thetford 565E | Chemicals, about $5/month | ✅ Yes, small capacity |
Which Toilet Is Best for Your Tiny House?
- Full-time off-grid: Nature’s Head or OGO composting toilet. Proven, affordable to run, no infrastructure.
- Off-grid with a big budget: Cinderella Freedom propane incinerating toilet. This is the low-maintenance luxury route.
- Parked with hookups: Standard low-flow flush toilet. Don’t overthink it.
- Weekend cabin or build-in-progress: Thetford Porta Potti now; upgrade later.
The Bottom Line
The toilet decision really comes down to one question: are you connected to utilities or not? With hookups, a cheap flush toilet wins. Without them, a composting toilet gives you the best cost-to-comfort ratio, with incinerating as the premium alternative. Just make sure your power system can handle it. Not sure it can? Run your appliances through our free Tiny House Solar Calculator and find out in two minutes.
Some links on this page are affiliate links. See our affiliate disclosure.
Tiny House Solar Calculator: How Much Power Do You Really Need?

As an Amazon Associate I earn from qualifying purchases. This post may contain affiliate links, which means I may earn a commission if you buy through my links at no extra cost to you.
Figuring out how much solar power you need for a tiny house can feel overwhelming fast. You start researching and suddenly you’re drowning in watts, amp hours, depth of discharge, and peak sun hours — and you still don’t have a clear answer. I built this calculator to cut through all of that. Enter your appliances and daily usage, adjust the system assumptions, and get preliminary estimates for battery capacity, solar panel wattage, and inverter output. No electrical engineering degree required.
Solar is just one line in your build budget. Planning the whole thing? See how much a tiny house costs in 2026, with real example budgets and a full breakdown table.
Try the Solar Calculator
Go ahead and try it out. Add your appliances, adjust the settings to match your situation, and scroll down for your results.
Open the calculator full-screen
What the Calculator Does
This calculator is designed for anyone planning an off-grid or solar-powered tiny house who wants a realistic starting point before talking to an installer or buying any equipment. You enter the appliances you plan to run, how many hours a day you’ll use them, and a few system variables like peak sun hours and battery depth of discharge. In return it gives you five planning estimates: your total daily energy usage, DIY battery bank size, solar panel wattage, estimated peak load, and inverter size. Think of it as a planning tool — it won’t replace a professional assessment, but it gives you a solid ballpark so you’re not going in blind.
How to Use the Calculator
Using the calculator is straightforward. Here’s a quick rundown of each section:
Appliances — Add each device you plan to run in your tiny house. Enter the appliance name, its AC wattage at the outlet (usually found on the device label or in the manual), how many hours per day you’ll use it, and how many of that item you have. The calculator models AC loads only, not 12V or USB DC devices.
💡 Pro Tip: Refrigerator Hours
A refrigerator cycles on and off, so compressor running hours are different from hours plugged in. The preset is only an example. Use measured energy or manufacturer data for your appliance, and make sure the wattage and hours describe the same operating condition. Confirm startup demand separately.
💡 Pro Tip: Standby Power (Vampire Power)
Some appliances draw power in standby. If you model active and standby use separately, use measured or manufacturer values and the hours spent in each mode. Avoid counting the same hours twice. Appliance standby consumption is separate from the inverter’s own idle draw.
Battery backup days — How many cloudy or low-sun days do you want your system to cover without recharging? Two to three days is a common starting point.
Peak sun hours — Use location-specific data from NREL’s PVWatts Calculator. Enter your address and use the “Solar Radiation (kWh/m²/day)” result; each kWh/m²/day equals one peak sun hour. Four hours is only an example starting value. For winter planning, use the lowest winter month rather than the annual average.
Solar delivery factor — The default 80% is an editable planning assumption for the combined path from rated panel output to appliance AC energy, including heat, wiring, charging/storage and inverter conversion. It is not a measured efficiency for your equipment. Inverter idle draw and recovery of an already depleted backup bank are not included.
DIY inverter efficiency — The default 85% is an editable planning assumption used for DIY battery sizing. Changing it does not change the solar delivery factor; review that combined factor separately. If you enter inverter idle draw separately, use conversion efficiency that excludes idle draw.
Inverter on-hours and idle draw — Enter how long AC output stays switched on each day, including time when appliances are not running. Use your inverter’s documented no-load consumption for idle draw, or leave it blank to exclude it. A blank field is an omitted allowance, not proof of zero consumption.
DIY battery depth of discharge — This is the usable share of the DIY battery before recharge. The calculator starts at 80% for lithium and 50% for lead-acid as editable planning assumptions; follow your battery manufacturer’s limits. These DIY settings are not applied to complete power stations.
Inverter safety margin — This adds an editable buffer above estimated peak load. Confirm your appliances’ starting demand and the inverter’s rated output and surge capability before choosing equipment.
Get the Free Tiny House Solar Sizing Cheat Sheet
Want a printable version of the formulas and appliance wattage estimates? Grab the free cheat sheet below.
What to Do With Your Results
Once the calculator gives you your numbers, here’s how to think about them:
Total daily energy usage — This is your baseline. Everything else is built around this number. If it feels higher than expected, go back and look at which appliances are driving it.
DIY battery bank size — This is an estimated nominal capacity under your chosen backup days, depth of discharge, inverter efficiency and any entered idle draw. It is a planning starting point, not a guaranteed runtime or final equipment specification. Complete power stations are assessed separately using their own stated planning rules.
For a more complete battery-specific method—including losses, backup days, usable capacity, and peak-load checks—read the step-by-step tiny-house battery sizing guide.
Recommended solar panel wattage — This is an estimated total array size for your appliance energy, not the size of one individual panel. It does not include inverter idle draw, and it does not check panel voltage, current or connector compatibility. For example, if the calculator suggests 400 watts, that could be two 200-watt panels or four 100-watt panels.
Inverter size — This is an estimated AC output requirement with your selected safety margin. Confirm running loads, starting demand and the inverter’s output and surge specifications before buying.
Remember, these are planning numbers — a good starting point before you talk to a solar installer or start pricing out equipment. Real world factors like your roof angle, shading, and local weather will affect your final system design.
Some links on this page are affiliate links. See our affiliate disclosure.
What You Need to Know Before Living in a Tiny House
 Introduction
In a world where simplicity is gaining traction, the allure of tiny-house living has captured the imagination of many seeking financial freedom, environmental sustainability, and a simplified lifestyle. The prospect of downsizing to a tiny house is not just a housing trend; it’s a movement toward mindful living. However, before embarking on this unique journey, there are crucial aspects to consider. This article serves as a comprehensive guide, offering insights into the essentials of tiny house living, from planning and design to legal considerations and personal adjustments.
Quick Tips for Tiny House Living
Before delving into the details, here are some quick tips to keep in mind when contemplating a move to a tiny house:
- Embrace Minimalism: Prioritize the essentials and declutter your life before moving into a tiny space. Minimalism is the key to successful tiny house living.
- Research Zoning Laws: Ensure you understand local zoning laws and regulations. Tiny houses may face legal challenges depending on your chosen location.
- Plan for the Long Term: Consider your future needs and plan your tiny house design and budget accordingly. A well-thought-out plan will help you adapt to changing circumstances.
- Join Tiny House Communities: Connect with others who have embraced or are considering tiny house living. Networking can provide valuable insights, support, and a sense of community.
Now, let’s delve into the detailed aspects of what you need to know before living in a tiny house.
Understanding Tiny House Living
Benefits of Living in a Tiny House
Tiny house living offers a range of benefits that have contributed to its popularity:
Financial Savings: One of the primary attractions of tiny house living is the potential for significant cost savings. Smaller spaces require less construction material, lower utility costs, and reduced maintenance expenses.
Environmental Sustainability: With a smaller footprint, tiny houses contribute to environmental conservation. They often encourage a more sustainable lifestyle, with options for off-grid living, composting toilets, and energy-efficient systems.
Simplified Lifestyle: Tiny houses prompt a reevaluation of possessions and priorities. Embracing a minimalist lifestyle can lead to increased contentment and reduced stress.
Challenges of Living in a Tiny House
Despite the appealing benefits, there are challenges associated with tiny house living:
Limited Space: The most obvious challenge is the constrained living space. Individuals or families must adapt to a downsized lifestyle, requiring creative storage solutions and multifunctional furniture.
 Zoning and Legal Considerations: Tiny houses may only be legally recognized as primary residences in some areas. Understanding and navigating zoning laws and building codes is crucial to avoid legal issues.
Adjustment to a Minimalist Lifestyle: Transitioning to a minimalist lifestyle can be emotionally and psychologically challenging. Letting go of unnecessary possessions and embracing simplicity may take time.
Planning and Design
Budget Considerations
Before breaking ground on your tiny house, thoroughly assess your budget:
Cost of Construction: Tiny homes can be cost-effective, but construction expenses can still accumulate. Consider factors like materials, labor, permits, and unexpected costs when creating your budget.
Long-Term Financial Planning: Plan for ongoing expenses, including utilities, maintenance, and any unexpected repairs. A well-prepared financial outlook will contribute to long-term success in tiny house living.
Design Considerations
Efficient design is paramount for a comfortable tiny house:
Maximizing Space Efficiency: Work with a designer to create a layout that maximizes every inch of space. Utilize vertical space, incorporate storage under furniture, and design multifunctional areas.
Multifunctional Furniture: Invest in furniture that serves multiple purposes. For example, a sofa that converts into a bed or a dining table that can be folded away when not in use.
Storage Solutions: Explore innovative storage solutions to make the most of limited space. Built-in shelves, storage under stairs, and compact organization systems are essential for tiny house living.
Legal and Regulatory Considerations
Zoning Laws and Regulations
Understanding local zoning laws is critical when planning a tiny house:
Research Local Zoning Laws: Different areas have varying regulations regarding tiny houses. Some may permit them as permanent residences, while others may only allow them as accessory dwellings. Research and comply with local zoning laws.
Building Codes and Permits: Ensure your tiny house adheres to building codes and obtain the necessary permits. Failure to comply with regulations can result in fines or eviction.
Land and Location Considerations: Assess the availability and suitability of land for your tiny house. Consider factors such as accessibility, proximity to amenities, and the potential for future expansion.
Environmental Impact
 Off-Grid Living Options
For those seeking a more sustainable lifestyle, consider these options:
Solar Power: Install solar panels to generate your electricity. This not only reduces your environmental impact but also offers energy independence.
Water Conservation: Implement water-saving techniques, such as rainwater harvesting and low-flow fixtures, to minimize your water usage.
Composting Toilets: Choose environmentally friendly toilet options, such as composting toilets, to reduce water consumption and create nutrient-rich compost.
Sustainable Practices in Tiny House Living
Promote sustainability in your daily life:
Reduced Consumption: Embrace a minimalist lifestyle to minimize your overall consumption. Choose quality over quantity when making purchases.
Recycling and Repurposing: Incorporate recycled and repurposed materials into your tiny house. This not only reduces waste but also adds character to your living space.
Energy-Efficient Appliances and Systems: Opt for energy-efficient appliances and systems to reduce your carbon footprint. This includes LED lighting, high-efficiency heating and cooling systems, and energy-efficient appliances.
Community and Social Aspects
Finding the Right Community
Building connections is crucial for a fulfilling tiny house experience:
Research Tiny House Communities: Explore existing little house communities and connect with residents. Learning from their experiences can provide valuable insights and support.
Networking with Other Tiny House Enthusiasts: Join online forums, social media groups, or local meetups to connect with other individuals interested in or already living the tiny house lifestyle.
 Maintenance and Upkeep
Regular Maintenance Routines
Preventive maintenance is essential for the longevity of your tiny house:
Check for Leaks: Regularly inspect your tiny house for any leaks, especially in the roof or around windows. Addressing leaks promptly can prevent more significant issues.
Inspect the Foundation: Ensure the foundation is secure and stable. Tiny houses on wheels require additional attention to the trailer’s condition.
Ventilation Maintenance: Proper ventilation is crucial in a small space. Regularly clean vents and filters to maintain a healthy indoor environment.
Dealing with Repairs in a Limited Space
Tiny houses require a unique approach to repairs:
Invest in Quality Materials: Use high-quality materials during construction to minimize the need for frequent repairs. Quality materials contribute to the durability of your tiny house.
Learn Basic DIY Skills: Acquire basic DIY skills to address minor repairs on your own. This not only saves money but also empowers you to take care of your living space.
Winterization and Seasonal Considerations: Prepare your tiny house for different seasons. Winterization may include insulating pipes, sealing gaps, and ensuring your heating system is efficient.
Personal Considerations
Assessing Personal Needs and Priorities
Before making the move, consider your personal preferences and priorities:
Evaluate Space Needs: Assess your space requirements realistically. Consider your daily activities and whether a tiny house can accommodate them comfortably.
Downsizing and Decluttering: Start downsizing early. Donate or sell items you no longer need and embrace a clutter-free lifestyle.
Mental and Emotional Preparedness: Prepare mentally and emotionally for the transition to a smaller living space. Be open to the challenges and rewards that come with a minimalist lifestyle.
Case Studies and Success Stories
Insights from Experienced Tiny House Dwellers
Learn from those who have successfully embraced tiny house living:
Interviews with Tiny House Dwellers: Gain insights from individuals or families who have made the transition to tiny house living. Learn about their challenges, successes, and tips for a smooth experience.
Lessons Learned: Discover common challenges and lessons learned from experienced tiny house dwellers. Their experiences can provide valuable guidance for newcomers.
Tips for a Successful Transition: Receive practical tips for a successful transition to tiny house living, from managing space effectively to maintaining a positive mindset.
Table of Things to Purchase with Prices
| Item | Price Range |
|---|---|
| Solar Panels | $1,000 - $10,000 |
| Water Harvesting System | $500 - $2,000 |
| Composting Toilet | $1,000 - $3,000 |
| Multi-Functional Furniture | $200 - $2,000 |
| High-Efficiency Appliances | $500 - $5,000 |
| DIY Repair Tools | $50 - $200 |
| Quality Construction Materials | Variable |
| Minimalist Decor and Storage | $100 - $1,000 |
| Networking Memberships/Events | Variable |
| Interviewing Experienced Dwellers | N/A (informational) |
Please note that these prices are approximate and can vary based on factors such as brand, quality, and location.
Conclusion
In conclusion, transitioning to a tiny house lifestyle is a unique and rewarding journey that requires careful consideration and planning. Understanding the benefits, challenges, and practical aspects of small-house living is essential for a successful experience. Whether you are drawn to financial savings, environmental sustainability, or a simplified lifestyle, embracing tiny house living involves a holistic approach to design, legal considerations, community engagement, and personal adjustments. By incorporating these insights into your decision-making process, you can embark on the path to a fulfilling and sustainable tiny house lifestyle.
HVAC Systems for Tiny Houses


Introduction
In the realm of sustainable living and minimalist lifestyles, the Tiny House Movement has gained significant traction. The allure of downsizing comes with its own set of challenges, and among them, ensuring optimal heating, ventilation, and air conditioning (HVAC) systems for these petite dwellings is paramount. This comprehensive guide aims to unravel the complexities of HVAC in tiny houses, offering valuable insights into the unique challenges, types of systems, energy efficiency considerations, installation options, and maintenance tips.
Quick Tips for Tiny House HVAC:
- Prioritize Space Efficiency: Opt for HVAC systems designed with compact spaces in mind to maximize every inch of your tiny home.
- Energy Efficiency Matters: Given the limited resources in tiny houses, choose energy-efficient HVAC systems to minimize environmental impact and reduce utility costs.
- Consider Off-Grid Options: Explore off-grid HVAC solutions, such as solar-powered systems, to embrace sustainability and reduce reliance on traditional power sources.
- Ventilation Is Key: Proper ventilation is key to maintaining air quality in confined spaces; consider Heat Recovery Ventilators (HRV) or Energy Recovery Ventilators (ERV).
- Regular Maintenance is Essential: Keep your HVAC system in top shape with regular cleaning, filter replacements, and professional inspections to avoid breakdowns and ensure longevity.
I. Unique Challenges of HVAC in Tiny Houses
Tiny houses pose distinctive challenges when it comes to HVAC systems. The limited space requires innovative solutions that balance functionality and efficiency. Additionally, off-grid considerations are often crucial for those seeking a more independent lifestyle. Acknowledging and addressing these challenges is fundamental to achieving a comfortable living environment.
II. Types of HVAC Systems for Tiny Houses
A. Mini-Split Systems
Mini-split systems, renowned for their space-saving design, offer an excellent solution for tiny houses. These ductless systems are easy to install and provide both heating and cooling functions. The flexibility of zone control ensures optimal temperature management, allowing you to customize comfort in specific areas of your tiny home.
Cost: The price of a mini-split system can range from $1,500 to $4,000, depending on the brand, capacity, and additional features.
B. Portable HVAC Units
Portable heating and cooling units are versatile options for tiny houses. These units are compact, easily movable, and don’t require extensive installation. While cost-effective, they may not be as energy efficient as other systems. However, their portability can be a significant advantage for those who plan to relocate their tiny homes.
Cost: Portable HVAC units typically cost between $200 and $800, depending on the brand and specifications.
C. Ventilation Systems
Proper ventilation is essential in tiny houses to prevent stuffiness and ensure a constant supply of fresh air. Heat Recovery Ventilators (HRV) and Energy Recovery Ventilators (ERV) are ventilation systems that help maintain indoor air quality while conserving energy. These systems recover heat from outgoing air, making them ideal for energy-efficient tiny homes.
Cost: HRV and ERV systems can cost between $1,000 and $2,500, depending on the model and features.
 III. Energy Efficiency and Sustainability
Tiny houses are often designed with sustainability in mind, and HVAC systems should align with these principles. Opting for energy-efficient solutions not only reduces environmental impact but also contributes to long-term cost savings. Solar-powered HVAC options offer an eco-friendly alternative for powering your heating and cooling needs.
IV. DIY vs. Professional Installation
Choosing between DIY installation and professional services is a decision that hinges on factors such as budget, skills, and the complexity of the selected HVAC system. While DIY installations may offer cost savings, professional installations ensure safety, compliance, and long-term support. Understanding the pros and cons of each approach is crucial for a successful HVAC setup in your tiny house.
V. Maintenance Tips for Tiny House HVAC
Regular maintenance is critical to the longevity and efficiency of your HVAC system. In a tiny house where every element plays a crucial role, neglecting maintenance can lead to discomfort and potential system failures. Establishing a routine that includes cleaning, filter replacements, and professional inspections will keep your HVAC system in optimal condition.
Table of HVAC Systems and Prices for Tiny Houses
HVAC System Description Price Range
Mini-Split System Ductless, space-saving, offers both heating and cooling functions, zone control for customized comfort. $1,500 - $4,000
Portable HVAC Unit Compact, movable, easy installation, suitable for those planning to relocate, cost-effective but less energy efficient. $200 - $800
Ventilation Systems (HRV/ERV) Maintains indoor air quality, recovers heat from outgoing air, energy-efficient for tiny homes. $1,000 - $2,500
Conclusion
Navigating HVAC systems in a tiny house requires careful consideration of space constraints, energy efficiency, and sustainability. Whether you opt for a mini-split system, a portable unit, or a ventilation system, understanding the unique challenges and available solutions is essential. By prioritizing space efficiency, embracing energy-efficient options, and maintaining your HVAC system regularly, you can create a comfortable and sustainable living environment in your tiny house.
Where to Find Used Tiny Homes for Sale
 Introduction:
The allure of tiny homes has swept across the housing landscape, captivating individuals seeking a simpler, more affordable, and environmentally conscious lifestyle. For those intrigued by the idea of downsizing without sacrificing comfort, purchasing a used tiny home presents a compelling option. In this guide, we’ll navigate the pathways to finding the perfect used small home, exploring online platforms, local communities, auctions, and more. Whether you’re a minimalist enthusiast, eco-conscious individual, or simply looking for a budget-friendly alternative, this guide will serve as your compass in the search for a cozy abode.
Quick Tips for Your Tiny Home Hunt:
Before diving into the myriad options available, here are some quick tips to streamline your search and ensure a smooth buying process:
- Define Your Budget: Establish a clear budget for your used tiny home purchase. Consider not just the initial cost but also ongoing expenses such as maintenance, utilities, and any potential customization.
- Research Local Regulations: Be aware of zoning and building regulations in your desired location. Some areas may have restrictions on tiny homes, so it’s crucial to ensure compliance.
- Prioritize Needs Over Wants: Tiny living requires prioritization. Identify your essential needs and focus on finding a tiny home that meets those requirements. You can always add personal touches later.
- Inspect Thoroughly: Conduct a detailed inspection of any used tiny home you’re considering. Check structural integrity, plumbing, electrical systems, and overall condition. Feel free to ask for maintenance records.
- Explore Financing Options: Investigate financing options tailored to tiny homes, such as personal loans or RV loans. Some financial institutions offer specialized programs for this unique housing choice.
Now, let’s delve into the various avenues you can explore to find the perfect used tiny home for your lifestyle.
I. Online Platforms:
Online platforms are a treasure trove of opportunities for finding used tiny homes.
- Tiny House Listings:
- Overview: A dedicated platform for buying and selling tiny homes.
- Tips: Create search alerts for specific criteria and vet sellers for credibility.
- Craigslist:
- Overview: A diverse marketplace where individuals often list used tiny homes.
- Tips: Use search terms and negotiate with sellers to secure the best deal.
- Facebook Marketplace:
- Overview: A social media-driven marketplace with a wide range of listings.
- Tips: Leverage local community groups and events for additional leads.
- Zillow:
- Overview: While known for traditional real estate, Zillow sometimes features unique properties, including tiny homes.
- Tips: Set up alerts and regularly check for new listings.
II. Tiny House Communities:
Joining tiny house communities can offer unique opportunities to find your dream home.
- Community Websites and Forums:
- Overview: Online platforms where tiny house enthusiasts share information and listings.
- Tips: Engage in discussions and attend events to network with potential sellers.
- Community Events and Workshops:
- Overview: Attend local workshops and events to connect with individuals in the tiny house community.
- Tips: Explore the potential of finding used homes within these gatherings.
III. Real Estate Auctions:
Real estate auctions can be a surprising source for affordable tiny homes.
- Government Surplus Auctions:
- Overview: Some government auctions feature surplus properties, including tiny homes.
- Tips: Research auction processes and be prepared for competitive bidding.
- Bank-Owned Property Auctions:
- Overview: Banks occasionally auction foreclosed properties, including tiny homes.
- Tips: Understand auction terms and conditions before participating.
IV. Local Classifieds and Bulletin Boards:
Local sources can yield hidden gems for those seeking a used tiny home.
- Community Bulletin Boards:
- Overview: Check local bulletin boards in community centers, cafes, or grocery stores.
- Tips: Leave your contact information on boards in areas you’re interested in.
- Local Newspapers and Classifieds:
- Overview: Traditional newspapers and classified ads may feature unique listings.
- Tips: Regularly check print and online classifieds for new opportunities.
V. Tiny Home Builders and Dealers:
Builders and dealers often have used inventory available for purchase.
- Tiny Home Builders Selling Pre-Owned Models:
- Overview: Some builders sell pre-owned models alongside their new buildings.
- Tips: Inquire with local builders about their inventory and potential customization options.
- Dealerships Offering Used Tiny Homes:
- Overview: Explore dealerships specializing in tiny homes, as they may have a range of used options.
- Tips: Attend little home expos where dealers often showcase their inventory.
VI. Inspection and Documentation:
Ensure a smooth buying process by prioritizing thorough inspections and proper documentation.
- Thorough Inspection:
- Importance: Check for structural integrity, plumbing, electrical systems, and overall condition.
- Tips: Hire a professional inspector if needed, and make sure to complete all details.
- Gathering Necessary Documentation:
- Importance: Ensure proper title and ownership verification and gather maintenance records.
- Tips: Verify legal aspects to prevent potential issues in the future.
VII. Financing Options:
Exploring financing options is crucial for making your tiny home dream a reality.
- Personal Loans:
- Overview: Consider personal loans for flexible financing options.
- Tips: Compare interest rates and terms from different lenders.
- RV Loans:
- Overview: RV loans are often used for mobile tiny homes on wheels.
- Tips: Look for lenders specializing in RV financing for favorable terms.
- Tiny Home-Specific Financing Programs:
- Overview: Some financial institutions offer specialized programs for tiny home financing.
- Tips: Research and inquire about any available programs tailored to your needs.
Table of Things to Purchase with Prices:
Item/Service Average Price Range Where to Find
Used Tiny Home $20,000 - $80,000 Online Platforms, Community Events, Dealerships
Compact Furniture $500 - $5,000 Furniture Stores, Online Retailers
Eco-Friendly Appliances $1,000 - $5,000 Appliance Stores, Eco-Friendly Retailers
Off-Grid Solutions $1,000 - $10,000 Specialty Stores, Online Retailers
Maintenance Services Varies Local Contractors, Online Platforms
Conclusion:
Embarking on the journey to find a used tiny home is an exciting venture that aligns with a desire for simplicity, affordability, and conscious living. By exploring the diverse avenues presented in this guide, you can uncover unique opportunities that fit your vision of the perfect tiny abode. Remember to stay diligent, prioritize your needs, and enjoy the process of discovering a home that not only fits your budget but also enriches your lifestyle. May your search for a used tiny home be both rewarding and fulfilling as you unlock the door to a new chapter of intentional living.
How Much Does a Tiny House Cost in 2026? (Real Examples + Budget Breakdown)

Quick answer: Most tiny houses cost between $30,000 and $100,000. A DIY build typically runs $15,000–$45,000, a professionally built tiny house on wheels usually runs $50,000–$120,000+, and land, permits, and utility hookups can add thousands more. Below is the full breakdown with real example budgets.
Tiny House Cost Breakdown at a Glance
| Type of Tiny House | Typical Cost Range | Best For |
|---|---|---|
| Basic DIY build | $15,000 – $45,000 | Handy owners with time and patience |
| DIY from a shell/kit | $25,000 – $60,000 | Faster DIY with less framing risk |
| Professionally built (foundation) | $45,000 – $150,000+ | Permanent placement, ADUs, backyard homes |
| Professionally built on wheels | $50,000 – $120,000+ | Mobility and certified (NOAH/RVIA) builds |
| Used tiny house | $20,000 – $70,000 | Budget buyers who inspect carefully |
These are typical U.S. ranges. Your total depends on size, materials, labor, and location — all covered below.
What Drives the Cost of a Tiny House
Size and Design Complexity
Size is the biggest single lever. Most tiny homes run 100–400 square feet, and every added foot means more materials and labor. Custom features — lofts, dormers, fold-away furniture, intricate cabinetry — raise costs faster than raw square footage does. Think of complexity like toppings on a pizza: the base price is predictable, but the extras are where the bill grows.
Location
Construction and land costs can swing 20% or more by region. Urban areas mean pricier land, stricter zoning, and higher labor rates. Rural placement is usually cheaper but may add utility-connection or transport costs.
Materials and Quality
Salvaged and recycled materials can cut thousands off a build. Premium sustainable materials (reclaimed hardwood, high-efficiency windows) cost more up front but lower maintenance and energy bills over time.
DIY vs. Hiring a Builder
Labor is roughly a third to half of a professional build’s price. Doing it yourself saves that, but mistakes in framing, electrical, or plumbing can erase the savings. A common middle path: buy a framed shell and finish the interior yourself.
Example Tiny House Budgets
Here are three realistic example budgets showing how the numbers come together.
Example 1: Budget DIY Build (about 200 sq ft, rural)
| Expense | Cost Range |
|---|---|
| Materials (lumber, roofing, siding, windows) | $8,000 – $18,000 |
| Trailer (if on wheels) | $4,000 – $9,000 |
| Permits and fees | $500 – $2,000 |
| Tools and equipment | $500 – $1,500 |
| Interior finishes and furnishings | $2,000 – $6,000 |
| Estimated total | $15,000 – $36,500 |
Example 2: Professionally Built Tiny House on Wheels
| Expense | Cost Range |
|---|---|
| Trailer and chassis | $10,000 – $30,000 |
| Professional labor | $20,000 – $60,000 |
| Interior furnishings and appliances | $5,000 – $20,000 |
| Permits, certification, fees | $1,000 – $5,000 |
| Estimated total | $36,000 – $115,000+ |
Component minimums rarely all line up — most professionally built homes on wheels land in the $50,000–$100,000 range.
Example 3: High-End Custom Build (about 400 sq ft, urban)
| Expense | Cost Range |
|---|---|
| Professional labor | $30,000 – $80,000 |
| High-quality materials | $20,000 – $60,000 |
| Design and customization | $5,000 – $20,000 |
| Permits and fees | $1,000 – $5,000 |
| Estimated total | $56,000 – $165,000+ |
Itemized Costs If You Build It Yourself
Planning a build? Here is a line-item view of where the money goes.
| Category | Item | Estimated Cost |
|---|---|---|
| Building materials | Lumber and plywood | $2,000 – $5,000 |
| Insulation | $500 – $1,500 | |
| Roofing | $1,000 – $3,000 | |
| Windows and doors | $1,500 – $4,000 | |
| Exterior siding | $1,000 – $3,000 | |
| Utilities and systems | Plumbing fixtures | $1,000 – $2,500 |
| Electrical wiring and fixtures | $800 – $2,000 | |
| Heating and cooling | $1,500 – $4,000 | |
| Solar power system (off-grid) | $5,000 – $15,000 | |
| Water heater | $500 – $1,500 | |
| Interior finishes | Flooring | $500 – $2,000 |
| Cabinetry and countertops | $1,000 – $3,000 | |
| Appliances | $2,000 – $5,000 | |
| Furniture and decor | $1,000 – $3,000 | |
| Permits and compliance | Building permits | $500 – $2,000 |
| Inspection fees | $300 – $1,000 | |
| Transport and setup | Trailer (if on wheels) | $3,000 – $8,000 |
| Towing and setup | $1,000 – $3,000 |
Off-Grid Power: The Cost Most Budgets Miss
If your tiny house will live off-grid, power is often the biggest line item after the structure itself — and the most common place people overspend by guessing. Before pricing panels or batteries, run your actual appliances through our free Tiny House Solar Calculator to see how much power you really need.
Then match that number to gear:
- Best solar kits for tiny houses — all-in-one vs. DIY panel kits by budget
- Best generators for a tiny house — backup power sized by running watts
- Tiny house water pump options — 12V demand pumps and hookup setups
- Toilet options for tiny houses — composting and off-grid choices
Hidden Costs to Budget For
Land
Buying land means a large upfront cost but long-term stability; renting a spot (or a tiny-home community lot) trades that for a monthly fee. Land is the wildcard that can double a “cheap” build.
Permits, Zoning, and Inspections
Zoning rules vary wildly by county — some restrict tiny house size or placement entirely. Budget a few hundred to a few thousand dollars for permits and inspections, and check the rules before buying land or a trailer.
Transportation
Moving a tiny house on wheels isn’t free. Towing, route permits, and specialized transport can run $1,000–$3,000 or more depending on distance and size.
Ongoing Costs
Utilities, insurance, parking or community fees, and a maintenance fund (plan on 5–10% of your build budget) all continue after move-in day.
How to Pay for It
Common routes: personal savings (no interest, slower start), personal loans, RV loans for certified tiny homes on wheels, and specialized alternative-housing lenders. Traditional mortgages rarely apply because most tiny houses don’t qualify as real property. Compare total interest cost, not just the monthly payment. (We’re not financial advisors — run big decisions past someone who is.)
Tiny House Cost FAQ
What is the average cost of a tiny house?
Most tiny houses cost between $30,000 and $100,000. DIY builds average toward the low end; professionally built homes on wheels average $60,000–$120,000+.
How much does it cost to build a tiny home yourself?
A typical DIY build runs $15,000–$45,000 depending on size, materials, and whether it’s on a trailer. Salvaged materials and a simple design keep you at the low end.
What should a tiny house cost breakdown include?
Structure (materials and labor), the trailer or foundation, utilities and power, interior finishes, permits and inspections, land, transport, and an ongoing maintenance fund. See the itemized table above.
What’s a realistic budget for a tiny house?
Set your target, then add 15–20% contingency — most builds run over. A $25,000 DIY plan should really be a $30,000 budget.
Is a tiny house cheaper than a regular house?
Almost always cheaper to buy or build, but cost per square foot is often higher than a traditional home because kitchens, bathrooms, and systems don’t shrink proportionally. The savings come from total price, utilities, and taxes — not per-foot efficiency.
The Bottom Line
A tiny house can cost as little as $15,000 or well past $150,000 — the spread comes down to who builds it, where it sits, and what goes inside. Nail down your power needs early (it’s the most under-budgeted system): start with the free Solar Calculator, and grab the Solar Sizing Cheat Sheet so you buy once and buy right.